Pizza Pull Apart Bread. This easy appetizer recipe is loaded with cheesy goodness. Serve for game day or at your next party!

Welcome to Day #1 of Appetizer Week, a multi-blogger event co-hosted by myself, and Kristen from Frugal Antics of a Harried Homemaker. With the big football game coming up, we wanted to make sure you had plenty of ideas for your game day spread. Each day we will be dishing up a different set of appetizers. We hope you enjoy this fabulous group of recipes.
I was chatting with my buddy, Kristen some time ago. We were gabbing about appetizers, and how much folks love game day food. One thing led to another and we decided to launch a yearly event. So this kicks off our first year of Appetizer Week. Okay, so maybe the part about it being yearly I might have forgotten to mention to Kristen. Surprise! She'll be thrilled. *giggles*

Okay, all kidding aside, welcome to a week filled with savoury appetizers to get you ready for the big game. As Kristen and I chatted I realized I had very few appetizers on my sites. So this week we are going to fix that by shifting into appetizer overdrive. Just in time for the big game. I have to say it's been fun delving into the world of appetizers. So many options, so little time.
I hope you enjoy Appetizer Week. Be sure to check out all the other great appetizer dishes all my bloggy buddies cooked up. We are going to help you throw the best game day party on the block!

Places to stalk Cravings of a Lunatic!
Facebook | Twitter | Pinterest | G+ | Kiss My Smoke
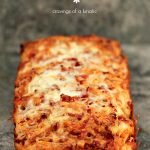
Pull Apart Pizza
Ingredients
- Pizza Dough homemade or store bought
- ½ to ¾ cup pizza sauce depending on taste
- 1 to 1 and ½ cups pizza mozzarella depending on taste
- ¼ to ½ cup of shredded pepperoni depending on taste
Instructions
- Preheat your oven to 350 degree F.
- Get a loaf pan prepared by spraying it with non-stick spray. Set aside.
- On your work surface roll out, or hand stretch your dough until it's spread evenly. Use some flour to make sure you dough isn't sticky, it will make the stacking process easier later.
- Now spread the pizza sauce over top evenly.
- Sprinkle the the cheese over top.
- Now toss the pepperoni over top.
- Take a pizza cutter or knife and cut your pizza into squares that will fit into the pan vertically.
- Stack about 4 squares high. I managed to get about 3 stacks with 4 high. Once you have them stacked take one at a time and carefully flip them sideways to they are standing up in the pan. So basically you're taking a horizontal stack and making it go in the pan vertically. Quickly do the same with your other stacks. It's okay if it doesn't touch the sides, it's going to expand as it cooks.
- Place in oven and cook for about 15 minutes. Pull the oven rack forward and toss some extra cheese on top. Slide it back into the oven and cook for another 10 to 15 minutes. You want the top golden brown and the cheese all nice and melted.
- Remove from oven and carefully take a knife and slide it around the edge of the pan to loosen the pizza. Turn upside down on a plate, then flip again onto another plate. This is a good skill to learn if you spend a lot of time in the kitchen.
- Serve with a big old cheesy smile!
Notes
Make sure you use flour on the work space or your dough will be too hard to work with and stack. Roll the dough out on the thin side, if the dough is too thick it won't cook properly. However if it's too thin you'll have trouble picking the stacks up to move them. So pay attention to your thickness when making this. We love cheese but don't go too crazy or the stacks will be hard to transfer to the loaf pan. You do lots of variations of this. We make pizza about once or twice a week so I'm always playing with new ideas and techniques to keep it interesting. Try some of the following recipes for your dough or sauce: Killer Spicy Pizza Dough Salsarific Pizza Dough Sweetums Slow Cooker Pizza Sauce

Visit all the other Appetizer Week participants for more Football Munching Temptations:
- Grilled Guacamole by Kiss My Smoke
- Crab Layer Dip by Frugal Antics of a Harried Homemaker
- Easy Individual Pizzas by Call Me Pmc
- Chocolate Malta Wings by Food Done Light
- Mom's Famous Chicken Ball by Hezzi-D's Books and Cooks
- Cheddar Bacon Dip by Yours and Mine Are Ours
- Tamari Roasted Chickpeas by Je suis alimentageuse
- Spinach Artichoke Dip by That Skinny Chick Can Bake
- Chicken Wing Dip by Rants From My Crazy Kitchen
- Microwave BBQ Meatballs by From Gate to Plate
- Pulled Pork Sliders by The NY Melrose Family
- Cheese Bean Dip by Wonky Wonderful
- Chipotle Cheese Dip by Dizzy Busy and Hungry
- Roasted Vegetables and Romesco Crostini by The Little Ferraro Kitchen
- Buffalo Ranch Cheese Ball by What's Cooking, Love?
- Buffalo Butternut Hummus by Farm Fresh Feasts
- Mini Maryland Crabcakes by Karen's Kitchen Stories
- Sesame Pecan Chicken Wings by Makobi Scribe
- Pina Colada Cheese Ball by Home Cooking Memories
- Roasted Tomatillo Salsaby Clarks Condensed
- Sweetly Spicy Southern Meatballs by Cooking In Stilettos
- Butternut Squash, Pomegranate & Goat Cheese Crostini by Cupcakes & Kale Chips
- Tex-Mex Chicken Salad Bites by Mom's Test Kitchen
- Caesar Mini Muffins by Food Lust People Love
- Four Cheese Garlic Flat Bread by Try Anything Once Culinary

You seriously have to try this. It's amazing. I usually do my pizza pull apart bread like bubble pizza, it's round pieces. I decided I wanted to try stacking them like cinnamon pull apart bread but was unsure how to do that with the toppings on it. So I did some digging on my pinterest boards, and remembered Kelly from Just a Taste did a Pizza Pull Apart Bread with this technique. I headed over to Kelly's site and she had a great photo tutorial how to stack them. So thank you to Kelly, your photos made the process easy to follow. I'm thinking mine would have been a mess without your guide. Luckily it turned out fabulous.

Craving more appetizer recipes? Check these out:


Toodles and smoochies! xx
Diana H
Too many to name but love the mini beakers!
Kim Beaulieu
I love the beakers.
kesha
I like the pop up container
Kim Beaulieu
I desperately need those.
Michael
I HAVE to try this pull apart bread. Oh my gosh.
Kim Beaulieu
Thanks so much.
Tammy
I like the Pastry Scraper / Chopper
Kim Beaulieu
It's a great tool.
Susan C
I love my garlic press!!
Kim Beaulieu
Me too.
Tiffany
The 3 Piece Large Bowl and Colander Set in Red
Wou be nice!
Kim Beaulieu
It is amazing.
Becky h
Wine aerating pourer
Kim Beaulieu
I love that one.
Jennifer
The snap-lock can opener!
Kim Beaulieu
Great tool.
Jammie Aughenbaugh
Non slip mixing bowls!
Sarah Chilson-Cole
My favorite is my swivel peeler!! They last forever and even my kids use it to help with dinner!!!
Kim Beaulieu
It's a great tool.
Kim Beaulieu
Great choice.
Christel Williams
I love my angled measuring cups! I can look down into what im measuring instead of bending over to see the side!
Kim Beaulieu
I use mine daily, love them.
Ann Elders
Really, just 2... I love my can opener... No more jagged edges... The measuring cups... They have the perfect slant
Kim Beaulieu
I love the measuring cups.
Tami
I love the salt and pepper grinders, use them all the time.
Kim Beaulieu
I love grinders, just fun to use.
Christa Lopez
I love the apple corer and slicer!
Kim Beaulieu
Apple corers are amazing.
Nicole Siebert
The Seal and Store Rotary Grater!
Kim Beaulieu
Great choice.
Kat
Love oxo pop containers!
Kim Beaulieu
I need those in my life.
Melissa Parker
I love my measuring cups!
Kim Beaulieu
Me too.
Celia Watts
I love the garlic press! I use it all the time!
Kim Beaulieu
I can't press enough garlic.
Elizabeth Madsen
Love oxo products! Too many to mention! Pizza looks delicious! Thanks for the recipe!
Kim Beaulieu
So true. Pizza rules, we eat it way too much.
luna moonshadow
My favorite oxo product is the silicone turners, i love the flexible stainless steel centers and the 600 degree safe silicone covering that doesnt scratch my pans or leave melted black strings in my food!!!
Kim Beaulieu
I don't have those yet but they sound amazing.
Meghan
I love my oxo measuring cups!
Kim Beaulieu
Me too, mine are used daily.