These red velvet parfaits are super easy to make and look lovely on any holiday table. Use leftover cake or whip up a cake just for these parfaits!

Okay peeps, y'all know I am always honest with you. This was NOT supposed to be a parfait. Not even kidding. It was supposed to be a cake roll. Unfortunately I had trouble rolling the cake roll so this recipe was altered to hide my oops. It's what I do. When in doubt "parfait it".
I'm not sure what that says about the fact that I have a zillion parfaits on my site.
*giggles*
I made Michael Symon's Mo Mos recipe. Then I realized I forgot an ingredient. Nothing crucial, unless you want to, you know, roll a cake. I forgot to add the extra egg whites which is sort of crucial to a good recipe for cake rolls. I'm determined to try again but in order to celebrate with my Holiday Party Peeps I had to make the best of a bad situation.
So head into the kitchen, screw up a cake, then make these parfaits. Don't you just love good advice?
These are fabulous. Sometimes you just have to go with it when you make a mistake. Take a bad situation and make it better. So the moral of the story is when in doubt "parfait it".
Make sure you stop by all my Holiday Party Peeps posts. Show them some serious love. They deserve it.

More Christmas Recipes:
- Buddy the Elf Cookies
- Oreo Bark
- Chocolate Coffee Truffles
- Red Velvet Parfaits
- Nutella Ganache
- Coconut Cake
- Turtle Truffles
- Pistachio Coconut Meringues

Places to stalk Cravings of a Lunatic
Facebook ~ Twitter ~ Pinterest
Instagram ~ YouTube ~ Kiss My Smoke
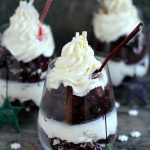
Red Velvet Parfaits
Equipment
Ingredients
For the Cake Portion:
- 5 large eggs
- ¾ cup brown sugar
- 1 ½ teaspoons vanilla extract
- ¼ cup butter melted
- 2 to 4 drops red gel food colour
- ¾ cup flour
- 6 tablespoons unsweetened cocoa powder
- ¼ teaspoon baking powder
- 1 pinch salt
For the Icing Filling (between the cake layers):
- 3 cup confectioners' sugar
- 1 cup butter softened
- 1 teaspoon vanilla extract
- 2 tablespoons heavy cream
- 1 pinch salt
For the Whipped Cream Topping:
- 1 cup heavy cream
- 2 tablespoons sugar
For the Garnish:
- White chocolate
- Any little Christmas sprinkles or candies
Instructions
For the Cake Portion:
- Preheat your oven to 350 degrees F.
- Spray cookie sheet (or sheets depending on the size of yours) with non stick spray, then line with parchment paper and spray again. Set aside.
- Place a small sauce pot of water on the stove and bring to a simmer.
- In your stand mixer whisk together the eggs, sugar, vanilla, and melted butter for 1 to 2 minutes, mixture should be combined well.
- Transfer mixture to a glass bowl and place over the simmering water on the stove (set aside the mixing bowl as you'll need it again).
- Add the food colouring to the bowl. (Remember the colour isn't going to be dark yet, it will look pink until you add the dry ingredients later. The cocoa is what turns it dark red.)
- Whisk while cooking until the sugar dissolves.
- Transfer the mixture to the mixing bowl again and place back on the stand mixer.
- Now whisk until light and fluffy, this should take about 6 minutes.
- In a medium sized bowl whisk together the flour, cocoa powder, baking powder and salt.
- Add the flour mixture slowly to the mixer and only allow it to mix long enough to incorporate the dry ingredients.
- If using one big cookie sheet (I have one of those massive ones, if yours are small use two) pour it all on the sheet and smooth it out. If using two sheets divide the dough and spread evenly over both cookie sheets.
- Place sheet, or sheets, in oven and bake for about 12 to 14 minutes.
- Allow to cool and break into small pieces for the parfaits.Set aside.
For the Icing Filling (between the cake layers):
- In a stand mixer combine sugar and butter , whisk on low speed until well blended.
- Now increase speed to high and whisk for about 3 minutes. At this point it should be fluffy.
- Now add the vanilla, cream, and salt. Whisk for another minute.
- Set aside until your ready to stack the parfaits.
For the Whipped Cream Topping:
- In a stand mixer combine the heavy cream and sugar, whisk on low to start then increase to high until the whipping cream is fluffy.
- Transfer to piping bag if desired. If not you can spoon the cream over top.
For the Garnish:
- Use a peeler to shave some chocolate pieces, or zest some. You can do this in advance or right over the top when the dessert is ready.
Putting it all together:
- In 4 parfait glasses add one layer of cake on the bottom.
- Now add the icing over top. Press down a bit with a spoon.
- Add another cake layer.
- Now add the whipping cream layer.
- Garnish with some pizazz!
- Serve with a big old "they'll never know I screwed up and this was suppose to be a cake roll" smile!
Notes
Nutrition
Thanks for visiting today!
If you’re looking for more dessert recipes be sure to check out my recipe index. You can also find a lot more cake recipes as well.
Be sure to follow me on Pinterest while you’re here. I love pinning great recipes! Also, make sure you follow me on Instagram. It’s a great way to stay up to date with the blog.
Toodles! xx
Diane (createdbydiane)
I coming to your house with my next kitchen oops, these look delicious!
Isabelle @ Crumb
Lady, nobody does parfaits like you.... even the unintentional ones! I honestly could just dive face-first into one of those babies right about now. <3
Charise
I'm a newbie to parfaits. What size cups/glasses did you use. I didn't realize there were so many to choose from!
Kim Beaulieu
These are just an 8 ounce wine glass. You can use just about any glass you like, then fill it accordingly. They look nice only filled partway, or all the way up. I also use mason jars quite often, shot glasses for mini parfaits, or you can even use beer mugs or any type of wine glass. The fun thing about them is you can customize them. So if you have adults and kids you can do big sizes for the adults and smaller sizes for the kids. You can buy really cute sets at Pier One Imports that have matching spoons. As you can tell I'm totally addicted to making parfaits of all kinds. This one will make 4 big parfaits so you could easily stretch it to 6 if you like. Hope that helps. No right or wrong way to make a parfait. Another tip is you can layer less or more depending on the "look" you want them to have. And sprinkles on top always look cute. xx